Building a Smartsheet Integration with Unite: Step-by-Step Workflow Guide
- Dan Morales
- 2 days ago
- 12 min read

This guide walks you through building an integration workflow in Unite. You’ll learn how to sync data between Smartsheet and your connected application, set up field mappings, apply filters, and automate updates across systems. Whether you’re syncing Azure DevOps work items, QuickBooks Online invoices, or HR data from Workday—Unite gives you a no-code path to easily build integrated Smartsheet solutions! See all supported integations here.
Jump to a section
4 Minute Demo
Want a quick look before diving in further? Watch this 4-minute demo to get a behind-the-scenes view of how easy it is to build an integration using Unite. Whether you’re exploring a trial, considering a subscription, or just curious about what’s possible—this walkthrough will show you how Unite connects Smartsheet to your favorite systems in just a few clicks.
Who Should Use This Guide?
This documentation is intended for users currently on a free trial or active subscription to Unite. To request a free trial, request more info, and schedule an introductory call you can contact us here.
Supported Integrations
Unite offers a suite of Smartsheet connectors that enable seamless integration with leading business applications. These connectors allow you to automate data flows, sync updates in real time, and streamline cross-platform processes—all without writing code.
By leveraging Unite’s connectors, teams can eliminate manual work, maintain data consistency across systems, and enhance collaboration across tools used for project, financial, and operational management.
This guide applies to all connectors currently available within Unite, including:
Azure DevOps
QuickBooks Online
Sage Intacct
ServiceNow
Workday
HubSpot
What to Know Before You Start
Before creating a workflow in Unite, you’ll need to have an active subscription or speak with our team about getting a trial started—contact us here to learn more. Review the following requirements and setup considerations to ensure a smooth integration experience before you start.
This section covers:
Required permissions and browser compatibility
Key concepts like how workflows work and how data syncs
Guidance on choosing the right Smartsheet sheet for your integration
SoftwareX security practices
You’ll encounter each of these elements as you build your workflow in Unite, so it’s helpful to understand them upfront.
Permissions
Smartsheet License: Active licensed user (US region only; EU and Gov regions not currently supported).
Application Access: Valid credentials for the external application (e.g., Azure DevOps, Workday, ServiceNow, etc).
Workflow Basics
What is a Workflow? A workflow defines how data synchronizes between 1 Smartsheet sheet and an external application.
Choosing Your Integrated Sheet
You can either
Use an existing sheet
Ideal if your sheet is already structured for integration.
Create a new sheet
Data Synchronization Options

Column/Field Mapping
One-Way Sync → Smartsheet
Data flows from your external system into Smartsheet. This is ideal when Smartsheet is used for reporting or tracking purposes and should always reflect the source of truth from another application. Mapped fields will be overwritten during each sync.
Two-Way Sync ↔
Row/Record Creation
New Rows → Smartsheet
By default, Unite creates new rows in Smartsheet at the bottom of your sheet when new records are added to the connected application. This ensures that your sheet stays in sync as new data is added to the source system.
New Rows → External App
TIP: You can enable or adjust these features anytime. As your Smartsheet solution and processes evolve, revisit your workflow settings to update field mappings, filters, and whether or not new records should be created in your external system from Smartsheet.Security and Data Privacy
SoftwareX prioritizes security for all of our products, this include Unite which has the following security components:
OAuth Authentication: Unite Uses Smartsheet OAuth, supporting the same security policies (SSO, MFA) enforced by Smartsheet System Administrators to access the SoftwareX Application.
Encrypted Data Handling: API keys and credentials are securely encrypted.
Delegated Permissions: Admin-authorized delegation for users without direct application access (premium feature).
Best-Practice Compliance: SoftwareX is actively implementing both organizational policies and technical safeguards that align with industry-standard security and privacy practices. SoftwareX is on track to achieve SOC 2 certification by the end of 2025, which will validate our controls for data confidentiality, integrity, availability, and privacy across our product ecosystem, including Unite.
How to Create a Workflow
Once your account is connected (this quick how to guide walks you through it in under 2 minutes), you’re ready to follow the steps below to build your workflow.
NOTE: Free trial accounts include access to one workflow and one connected account—specifically for testing core functionality. To unlock advanced features and build full-scale integrations, a premium plan is required.Step 1: Settings Tab


Click the ➕(Create a New Workflow) icon in the left-side rail.
Define these settings:
Sheet: Select from your Smartsheet sheets or create a new one. New sheets will automatically include columns required for field mapping. You can also create new columns in your existing sheet if you choose to work from a pre-existing sheet.
Account: Choose your connected application account. If you’ve connected multiple accounts, you’ll see more than 1 account available for selection.
Sync Frequency: Free trial users can select Manual; paid plans unlock hourly, daily, weekly, and monthly intervals. This controls how often data is refreshed between systems.
Step 3: Data Tab

Select the application-specific dataset you'd like to integrate, for example:
For Azure DevOps, select the organization and project where "Work Items" live.
For Accounting systems, select data types like Invoices, Purchase Orders, or Expenses
For CRM's, choose data types like Opportunities, Contacts, and Leads
Choose either of the following data formats:
Summary Data
Each record is represented as a single row in Smartsheet. This is ideal for datasets that do not require nested or hierarchical structures. Summary Data provides a flat view where each row maps directly to an object in the external system—for example, one row per invoice, task, customer, or employee.
Detailed Data
Step 4: Map Fields Tab


In this screen, you configure how specific data fields from your application match to columns in your Smartsheet sheet.
Choose either of the 3 options to get started
Push to Smartsheet (Recommended)
This option is best for users starting fresh who want to get up and running quickly without manually selecting each field. Unite automatically pulls in all available fields from the selected object or dataset in the external application. Corresponding columns are then created in the Smartsheet sheet. These fields are mapped with a default data flow direction from the external application to Smartsheet.
Sync Values Bi-Directionally
Configure Manually
Refining Your Mapping Selection
Regardless of the option you choose, all mapped fields can be customized 1x1 and can be reviewed and edited over time. This allows you to fine-tune your configuration by updating field selections, modifying which Smartsheet columns are linked, or adjusting field names to better align with your solution design.
Additionally, the sync direction for each field can be modified independently as long as that field is not restricted by system policies or permissions. Fields that are designated read-only by the external application—such as auto-generated IDs, timestamps, or calculated values—will be locked to a one-way sync and cannot be updated from Smartsheet. Visual indicators within the interface will help identify these read-only mappings.
TIP: You can customize your Smartsheet column types and move your sheet columns around in your sheet as needed .Required Field Mappings
All workflows, regardless of data type require the following default fields:
ID: Used to match the source record with the row in Smartsheet.
Row Type: Label that distinguishes parent and child rows.
Sync Errors: Populates any errors returned from the external application to assist with troubleshooting.
Step 5: Filters Tab

Filters allow you to control what subset of your data is integrated between Smartsheet and the connected application. Applying filters correctly is essential for reducing data volume, improving sync performance, and targeting only the most relevant records.
Filter data going to External App from Smartsheet
Use an existing filter saved within your Smartsheet sheet to determine which rows are eligible to sync to the external system. For example, a filter might only include rows where the "Approval Status" column is marked as "Approved" or where "Sync to System" is checked. Only the rows that meet the filter's criteria at the time of synchronization will be considered.
Filter coming from External App to Smartsheet
TIP: Filtering capabilities may vary slightly between connectors. Always review the on-screen helper text and available dropdowns within the Unite filter interface to understand the supported criteria and filtering syntax for your specific integration.Step 6: Summary Tab

The summary screen presents a final overview before creating the workflow. In this final workflow screen you will:
Name the workflow (always editable if you need to change the name).
Confirm object type, selected Smartsheet sheet, and connection settings.
Choose two key row-level integration behavior options:
Push New Items from Smartsheet
Automatically create new records in your external system from new rows added to Smartsheet (premium plans only).
Delete Missing Rows
Workflow Management

Once your workflow is created, it will appear on the Workflows Home Screen, which provides a centralized view of all workflows you’ve configured. From here, you can manage the lifecycle, settings, and performance of each workflow.
Each row in the Workflows Home Screen includes:
The external application and object type used
The name of the connected Smartsheet sheet
The workflow's sync frequency and last run time
A color-coded last run date/time indicating success, warning, or failure
The workflow creator (owner) for tracking accountability
Workflow Home Settings
1.Edit Workflow Settings:
Hover over the workflow name and click to open the workflow editor. You can revise mapped fields, adjust filters, and update sync directionality. Any changes made will apply to future sync cycles.
Please note that some configuration elements become locked after the workflow is initially created. Specifically, settings selected in the Data Tab—such as the external data object (e.g., Invoices, Work Items, or Opportunities) and the structural format (Summary vs. Detailed/Hierarchical)—cannot be modified once the workflow is saved. This is because downstream mapping, filters, and sync logic are tied to the schema and structure of that selected dataset. If changes to these foundational elements are needed, you must disable or delete the existing workflow and create a new one with the desired configuration.
2.Manually Run a Workflow
3.Access the Connected Sheet
4.View Last Run Logs
5.Delete or Disable
Reviewing Logs and Troubleshooting
Unite provides visibility into synchronization activity and system-level diagnostics to help you validate your setup and troubleshoot issues when your integration isn't behaving as expected..
Run logging for each workflow

From the Workflows Home Screen, you can access the log summary for each workflow via the "Last Run" timestamp column. These summary logs include:
Sync status: ie "Completed Successfully," "Completed with Warnings," or "Failed."
Sync duration and timestamp
Number of records added, updated, or deleted
Summary messages from the system API's when errors are identified
TIP: These logs provide high-level insights but do not include row-level errors. For more detailed troubleshooting, refer to your Smartsheet sheet’s Sync Errors column. See next section for more.Sync error messages in the integrated sheet
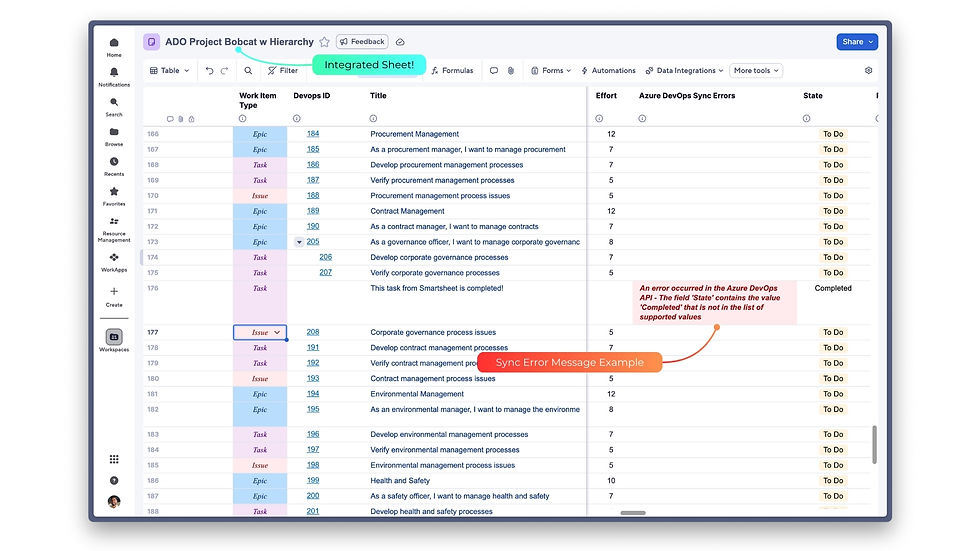
The Sync Errors column captures row-level error messages returned by the integrated systems external application. These errors often include specific details such as:
Invalid field values or data types
Missing required fields
Unsupported operations (e.g., trying to update a read-only field or trying to create a new record without associated line items or data points.
Keeping this column visible in your sheet is critical for identifying and resolving integration issues —especially after changes to filters, field mappings, or system permissions.
TIP: You can build Smartsheet automations on your Sync Errors column to quickly surface if/when issues arise.Troubleshooting Tips
If your workflow isn’t syncing as expected or is producing errors, use the checklist below to isolate and resolve common root-causes of failed integration sync's.
Check Permissions
Ensure the workflow owner retains access to both the Smartsheet sheet (as an Admin) and the external system's data set. Losing access (e.g., being removed from a workspace or project) will break the workflow.
Review the Sync Errors Column
Inspect the Workflow Run Logs
Validate Field Mappings
Review Filter Criteria
Monitor Smartsheet Sheet Size Limits
Get Support or Contact Us to Learn More
If you’ve gone through the checklist above and still run into issues, don’t worry—our team is here to help. We know integrations can get complex, especially when workflows span Smartsheet, external systems, and internal teams.
Submit a Support Request if you’re a current subscriber or in a free trial and need help troubleshooting errors, reviewing sync behavior, or configuring your workflow.
Just exploring Unite or looking to trial the connector? Contact our team here to ask questions, get pricing, or start a conversation about whether Unite is the right fit for your integration needs.

Comments